
⚙️ How to Install BlogNews for Elementor
Like the other WordPress plugins, you can easily install and activate our BlogNews For Elementor Addons from the WordPress Plugin Directory. But make sure before activating the BlogNews For Elementor Plugin you need to active the Elementor Page Builder Plugin first. To install the BlogNews For Elementor follow the bellow steps,
Step 1:
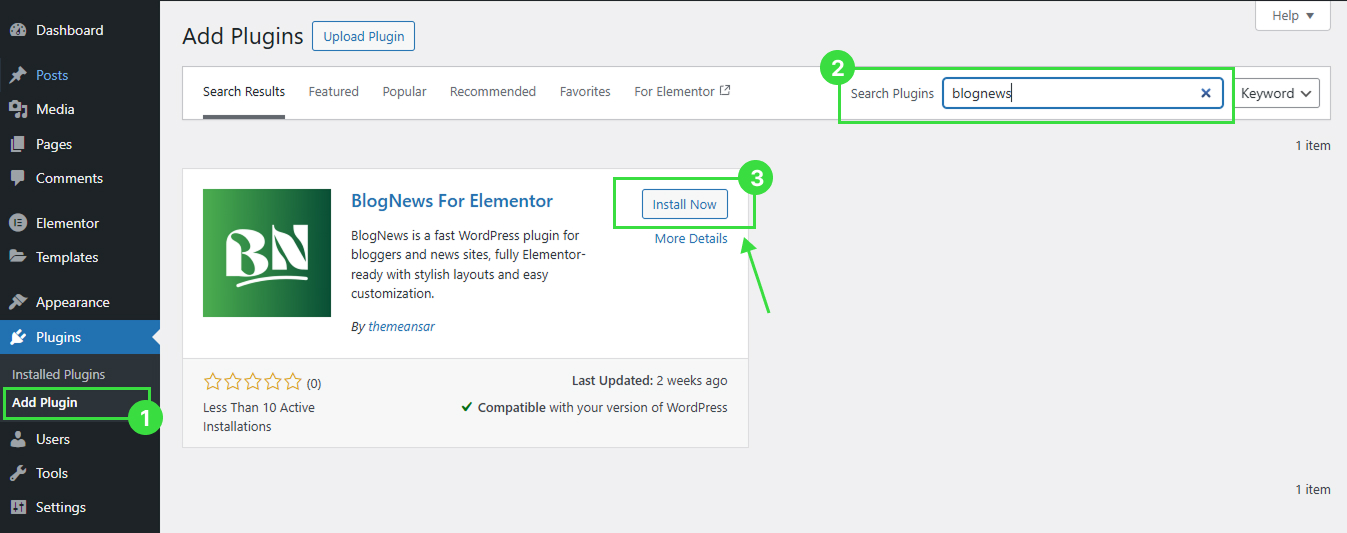
Go to your WordPress dashboard and navigate to wp-admin -> Plugins -> Add New.
Then in the search box type these keywords “blognews” and click the Install button.
Step 2:
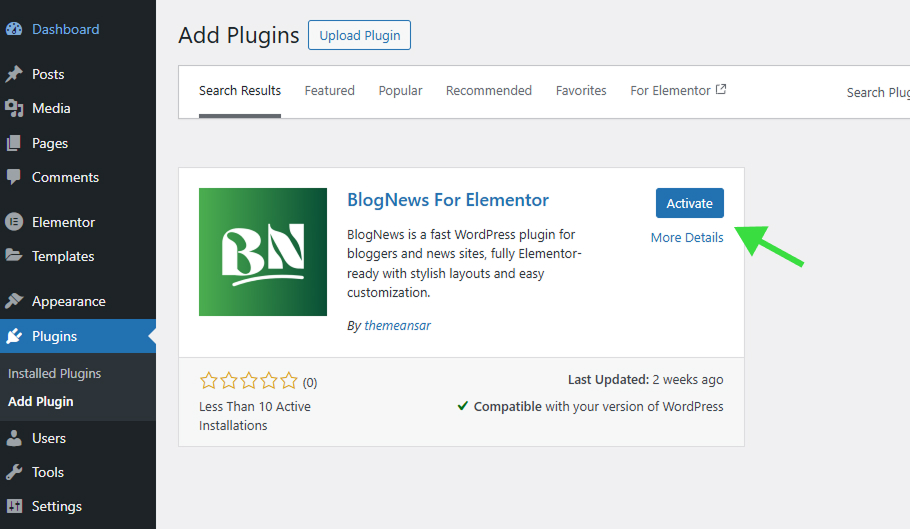
After successful installation, you have to click the “Activate” button to activate the BlogNews for Elementor.
Step 3:
After you activate BlogNews for Elementor, you’ll be redirected to a quick Freemius integration screen.
This screen helps you connect with our BlogNews Team for better product updates, security improvements, and support.
If you click Allow Button, you’ll:
- Receive important updates and feature announcements
- Help us improve BlogNews through anonymous usage data
- Get access to helpful tips and early feature releases
(We never collect any sensitive or personal information — only basic, non-identifiable plugin usage data.)
Note: You can also click Skip to continue using BlogNews for Elementor normally. All plugin features will still be available without any limitations.
So our recommendation is that you click the Allow Button for important updates and feature announcements.
📊 BlogNews Dashboard
We have designed an intuitive and user-friendly dashboard for BlogNews for Elementor to help you manage everything in one place. Inside the dashboard, you’ll find five main tabs — Home, Widgets, Site Builder, Starter Sites, and Free vs Pro.
🏠 Home Tab
In the Home tab of BlogNews, you’ll find all the essential information and helpful resource links — everything you need to get started quickly.
Here you can access:
- 📘 Documentation & Knowledge Base – Find all the detailed guides and tutorials.
- 🎥 Video Tutorials – Watch step-by-step videos on using BlogNews widgets and layouts.
- 💬 Support Channel – Get in touch with our support team directly from your dashboard.
- 💡 Feature Requests – Suggest new features or improvements for future updates.
- 🆕 Latest Updates – Stay informed about new widgets and enhancements added to BlogNews.
🧩 Widgets Tab
Here, we’ve introduced the ability to activate or deactivate individual widgets, as well as perform bulk activation and deactivation — giving you full control over which BlogNews widgets are active on your site.
You can also easily distinguish between Free and Pro widgets using the filtering options provided at the top of the list. This helps you manage your widgets more efficiently based on your version.
Please make sure that after activating or deactivating any widget — or performing a bulk action — you click the “Save Settings” button to apply your settings successfully.
🏗️ Site Builder Tab
In the Site Builder tab of the BlogNews Dashboard, you’ll find powerful options to design and manage your entire website layout — all from one place.
Using the BlogNews Site Builder, you can easily create and customize essential site parts such as:
- 🏠 Front Page
- 📰 Single Post Page
- 🧭 Header & Footer
- 🔍 Search Page
- 📁 Archive Page
- ⚠️ 404 Page
- 🧩 Templates
Each of these templates can be built and edited visually using Elementor, giving you complete freedom to design without writing any code.
With BlogNews Site Builder, you can manage your entire blog or news website design from start to finish — ensuring a consistent layout, faster workflow, and professional results every time.
🚀 Starter Sites Tab
The Starter Sites tab in the BlogNews Dashboard gives you access to a collection of pre-built blog, news, and magazine templates.
These starter sites are designed to help you launch a professional-looking website instantly, without starting from scratch.
What You Can Do in the Starter Sites Tab:
- Browse Templates – Explore all available blog, news, and magazine templates.
- Preview Templates – See how each template looks before installing it.
- Install Templates – Quickly import your chosen template with a single click.
- Customize with Elementor – Once installed, you can fully customize the template using Elementor to match your style and branding.
Using the Starter Sites tab, you can save hours of design work and get your website up and running fast and effortlessly.